Face painting unlocks creativity for all ages, offering a delightful art form! Beginner guides and tutorials empower anyone to create vibrant designs, step-by-step.
From simple butterflies to superhero masks, learning face painting is accessible and fun, fostering imagination and joyful expression at events and beyond;
What is Face Painting?
Face painting is a captivating art form where the human face becomes the canvas! It’s about transforming appearances using cosmetic-grade paints, creating whimsical designs and bringing imaginations to life. Whether it’s a simple butterfly or a complex superhero mask, face painting offers a unique avenue for self-expression.
Beginner guides break down the process into manageable step-by-step tutorials, making it accessible to everyone. These guides often cover essential techniques, from loading brushes correctly to blending colors seamlessly. Learning resources, including online courses and video libraries, provide comprehensive instruction. It’s a fantastic way to add fun and creativity to parties, events, or simply a playful afternoon!
The Joy of Face Painting for Kids and Adults
Face painting sparks immense joy in both children and adults! For kids, it’s a magical experience – transforming into their favorite characters fuels imagination and creates lasting memories. Step-by-step tutorials empower anyone to bring these fantasies to life, fostering creativity and self-expression.
Adults also find delight in face painting, whether it’s for themed events, Halloween, or simply artistic enjoyment. Learning through beginner guides and online resources unlocks a new skill and provides a unique outlet. It’s a fantastic way to connect with inner creativity and share joy with others, making every occasion more vibrant and fun!
Essential Face Painting Supplies
Essential supplies include safe, non-toxic paints, varied brushes, sponges, and optional glitter/stencils. Tutorials highlight the best tools for vibrant, easy designs!
Choosing Safe and Non-Toxic Face Paints
Prioritizing safety is paramount when selecting face paints, especially for children. Always opt for paints specifically labeled as “non-toxic” and “hypoallergenic” to minimize the risk of allergic reactions or skin irritation. Look for paints that comply with safety regulations, such as those approved by the FDA or adhering to European cosmetic standards.
Water-based face paints are generally considered safer than alcohol-based options, as they are less drying to the skin. Before applying any paint, perform a patch test on a small area of skin to check for sensitivity. Tutorials often emphasize the importance of quality paints for beautiful, safe designs!
Types of Face Paint: Water-Based vs. Alcohol-Based
Water-based face paints are the most popular choice for beginners and children, offering easy application, simple removal with soap and water, and a lower risk of skin irritation. They’re ideal for creating vibrant, colorful designs, and many tutorials focus on mastering techniques with this type.
Alcohol-based paints, while offering superior longevity and a matte finish, are less forgiving and require more skill. They dry quickly and are more difficult to blend, and removal necessitates a specialized makeup remover. These are often favored by professionals for detailed work, but require caution.
Brushes: Shapes, Sizes, and Uses
Face painting brushes come in a variety of shapes and sizes, each serving a specific purpose. Round brushes are excellent for outlining and detailed work, while flat brushes are ideal for base coating and blending larger areas. Angle brushes create sharp lines and precise shapes, perfect for petals or leaves.
Brush size impacts detail; smaller brushes offer precision, while larger brushes cover more ground quickly. Many tutorials demonstrate how to load brushes correctly and maintain them for optimal performance, ensuring smooth application and preventing paint wastage.
Sponges and Other Application Tools
Beyond brushes, sponges are crucial for creating smooth, even base coats and textured effects in face painting. High-density sponges offer better control, while sea sponges produce a more stippled, organic look. Brush pens are fantastic for fine details and outlining, offering precision similar to a brush but with added convenience.
Stencils simplify complex designs, especially for beginners, ensuring clean lines and consistent shapes. Many tutorials showcase how to effectively use these tools alongside brushes and sponges, expanding creative possibilities and achieving professional-looking results.
Glitter, Stencils, and Additional Accessories
Glitter adds sparkle and magic to any face painting design! Use cosmetic-grade glitter and a suitable adhesive, like fixer gel, for safe application. Stencils are invaluable for beginners, enabling precise shapes and designs effortlessly. They streamline complex patterns, like spiderwebs or scales, making intricate work achievable.
Other accessories, such as rhinestones and face paint brushes of varying sizes, enhance creativity. Many tutorials demonstrate how to integrate these elements, elevating designs from simple to spectacular. Experimentation is key to discovering unique effects!
Preparing for Face Painting
Skin preparation is crucial: clean and moisturize the face first! A tidy workspace and strict hygiene practices ensure safety and fantastic results.
Skin Preparation: Cleaning and Moisturizing
Before beginning any face painting adventure, proper skin preparation is absolutely essential. Start with a gentle cleanse to remove any dirt, oils, or lotions. A mild soap and water work wonderfully, followed by a thorough pat-dry with a clean, soft towel.
Next, apply a light, fragrance-free moisturizer. This creates a smooth canvas for the paints and helps protect the skin. Avoid heavy creams, as they can interfere with paint adhesion. Allow the moisturizer to fully absorb before applying any paint.
Remember, a well-prepared surface ensures vibrant colors, comfortable wear, and minimizes the risk of irritation. Prioritizing skin health is key!
Setting Up Your Workspace
A well-organized workspace is crucial for a smooth face painting experience. Choose a well-lit area with a stable surface, ideally covered with a disposable tablecloth for easy cleanup. Arrange your supplies – paints, brushes, sponges, water container, paper towels – within easy reach.
Keep a mirror handy for both you and the person being painted. Have a designated area for clean and dirty brushes, preventing cross-contamination. Consider a small trash can for disposable items.
Organization minimizes stress and maximizes creativity, allowing you to focus on the art itself. A tidy space equals a happy painter!
Hygiene and Safety Precautions
Safety is paramount when face painting. Always use hypoallergenic, non-toxic, and FDA-compliant paints specifically designed for skin. Never use acrylics or craft paints! Clean brushes thoroughly with soap and water after each use to prevent bacterial growth.
Avoid painting anyone with open wounds, rashes, or infections. Use a fresh sponge or brush for each person to prevent cross-contamination. Perform a patch test on a small skin area before applying paint extensively, checking for allergic reactions.
Prioritize cleanliness and responsible practices for a fun and safe experience!

Basic Face Painting Techniques
Mastering basic techniques—loading brushes, creating lines and shapes, and blending colors—is crucial. Stencils offer precision, enhancing designs for beginners and pros alike!
Loading Your Brush or Sponge
Properly loading your brush or sponge is fundamental to successful face painting. Dip the brush tip into the paint, avoiding submerging it completely. Gently swirl to coat the bristles, then tap off any excess against the palette’s edge.
For sponges, dab lightly to absorb paint; avoid pressing hard, which can create a muddy consistency. A slightly damp sponge works best with water-based paints. Remember, less is often more! Building up layers gradually provides better control and prevents cracking.
Experiment with different loading techniques to discover what works best for various paint types and desired effects. Consistent loading ensures smooth, even application and vibrant designs.
Creating Lines, Dots, and Shapes
Mastering basic elements like lines, dots, and shapes is crucial for any face painting design. For clean lines, use a fine-tipped brush and maintain consistent pressure; Practice varying line thickness by adjusting brush angle and paint load.
Dots are easily created with the brush tip, varying size with pressure. Shapes, like hearts or stars, can be freehanded or aided with stencils. Start with light sketches before applying full color.
Consistent practice builds muscle memory and control. These foundational skills unlock more complex designs and allow for creative expression.
Blending Colors Effectively
Achieving seamless color transitions is key to professional-looking face paint. Begin by applying the lighter color first, then gently layer the darker shade along the edge you want to blend. Use a clean, damp sponge or brush to softly work the colors together.
Circular motions and light pressure prevent harsh lines. Avoid over-blending, which can muddy the colors. Water-based paints blend more easily than alcohol-based. Practice blending different color combinations to expand your skillset.
Blending creates depth and dimension, elevating your designs.
Using Stencils for Precise Designs
Stencils are invaluable for creating intricate details and consistent shapes in face painting, especially for beginners. Secure the stencil firmly against the skin using gentle pressure – avoid movement! Load a stencil brush or sponge with a small amount of paint, then use a pouncing or stippling motion.
Avoid brushing across the stencil, as this can cause paint to bleed underneath. Lift the stencil carefully to reveal the design. Clean your stencils immediately after use to prevent paint buildup. Experiment with layering colors and multiple stencils!
Step-by-Step Face Painting Tutorials
Tutorials offer clear, guided instructions for popular designs like butterflies, superhero masks, and kitty cats, building confidence and skill with each step!
Easy Butterfly Design
Creating a butterfly is a fantastic starting point for beginners! Begin with a light base coat, then use a round brush to paint symmetrical wing shapes extending from the eyes.
Next, add colorful details within each wing using dots, swirls, and teardrops – layering colors enhances the effect. Don’t forget antennae extending from the forehead!
For added sparkle, gently apply glitter to the wings using a clean brush or sponge. Remember to use face paint specifically designed for skin, ensuring safety and vibrant results. Practice makes perfect, so embrace experimentation and have fun with this beautiful design!
Superhero Mask Tutorial
Transform into a powerful hero with a classic mask design! Start by outlining the mask shape around the eyes and bridge of the nose using a fine-tipped brush and your chosen color – blue, red, or black are popular choices.
Fill in the mask area with solid color, ensuring even coverage. For a dynamic effect, add shading around the edges to create depth. Consider adding a superhero emblem, like a star or lightning bolt, on the forehead or cheeks.
Remember to use non-toxic paints and allow each layer to dry slightly before adding details. This design is quick, impactful, and perfect for inspiring imaginative play!
Kitty Cat Face Painting Guide
Unleash your inner feline with an adorable kitty cat design! Begin by painting the base coat – typically white – across the face, avoiding the eyes and lips. Use a sponge for smooth application.
Next, add a black nose and whiskers using a fine brush. Don’t forget the cute triangular ears above the eyebrows! For extra detail, paint a pink inner ear and add small white highlights to the eyes to make them sparkle.
This classic design is easy to create and guaranteed to bring smiles. Snazaroo face paints are perfect for this look!
Simple Flower Design
Create a blossoming masterpiece with a simple flower design! Start with a light-colored base around the eye, like pink or lavender, using a sponge. Then, using a round brush and a contrasting color – perhaps white or yellow – begin painting petals radiating outwards from the center.
Add a small, colorful dot in the center of the flower to represent the flower’s heart. For added flair, outline the petals with a darker shade to make them pop. This design is quick, cheerful, and perfect for beginners!
Spooky Spiderweb Design
Transform into a creature of the night with a spooky spiderweb! Begin by painting a thin, white line extending from the outer corner of the eye towards the hairline. Then, create several curved lines radiating outwards from this initial line, resembling spiderweb strands.
Connect these strands with additional curved lines, forming a web-like pattern. For a chilling touch, add a small black spider to the web using a fine-tipped brush. This design is ideal for Halloween or any spooky occasion, offering a delightfully eerie look!
Advanced Face Painting Techniques
Elevate your artistry! Master depth, dimension, highlighting, and shading for realistic effects. Explore special FX using fake blood and wax for stunning transformations.
Creating Depth and Dimension

Achieving a three-dimensional look in face painting moves beyond flat color application. It requires understanding how light interacts with the face’s contours. Begin by identifying the natural highlights and shadows – cheekbones, brow ridges, and under the chin are key areas.
To create depth, use darker shades in recessed areas, subtly blending outwards. Conversely, apply lighter shades to protruding features to make them ‘pop’. Layering colors is crucial; build up gradually rather than applying heavy pigment at once. This allows for smoother transitions and a more realistic effect. Practice blending techniques to avoid harsh lines, and remember that subtle changes can make a significant impact.
Highlighting and Shading
Highlighting and shading are fundamental techniques for transforming a flat face paint design into a captivating, realistic image. Highlighting involves applying lighter shades to areas where light naturally falls – the brow bone, bridge of the nose, and upper cheekbones. This brings those features forward, creating a sense of prominence.
Conversely, shading utilizes darker tones in recesses like under the cheekbones, along the jawline, and within the eye sockets. This creates depth and definition. Blending is paramount; seamlessly merge the shades to avoid harsh lines. Experiment with different color combinations to achieve desired effects, and remember less is often more!
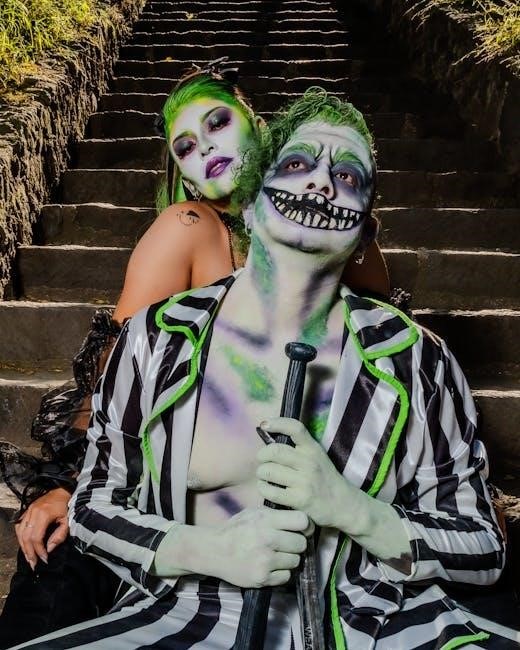
Using Fake Blood and Wax (Special FX)
Special FX face painting elevates designs to dramatic levels! Begin with a base layer of face paint, then carefully apply spirit gum to adhere prosthetic wax. Sculpt the wax to create wounds, scars, or other desired textures. Blend the edges seamlessly with a sponge and paint over with appropriate colors – reds, purples, and browns for realistic bruising.
Fake blood adds a chilling touch. Use a non-toxic, water-based formula and apply sparingly for a believable effect. Remember to test all products on a small skin area first to check for allergies. Practice makes perfect – experiment with layering and blending for truly terrifying results!
Face Painting for Events and Business
Face painting at events can become a profitable business! Develop a portfolio, price services competitively, and market your skills to build a thriving creative venture.
Pricing Your Services
Determining your pricing requires careful consideration of several factors. Begin by researching local competitors to understand the prevailing rates for face painting services in your area.
Consider your experience level; beginners may charge less, while seasoned professionals can command higher fees. Factor in the cost of your supplies – paints, brushes, glitter, and hygiene products – and allocate a reasonable amount for replacement and upkeep.
Pricing structures can vary: you might charge per hour, per face, or offer package deals for events. A basic face design could start at $5-$10, while more elaborate designs could range from $15-$25 or more. Don’t undervalue your time and artistic skill!
Marketing Your Face Painting Business
Effective marketing is crucial for attracting clients. Create a professional online presence with a website or social media pages showcasing your face painting designs and services. High-quality photos of your work are essential!
Utilize platforms like Facebook and Instagram to share your creations, run promotions, and engage with potential customers. Consider offering introductory discounts or package deals to incentivize bookings.
Networking with event planners, party organizers, and local businesses can generate leads. Word-of-mouth referrals are powerful, so encourage satisfied clients to spread the word about your artistry!
Building a Portfolio
A strong portfolio is your visual resume! Document your face painting work with high-quality photographs showcasing a diverse range of designs and skill levels. Include images of both simple and complex creations, demonstrating your versatility.
Prioritize clear, well-lit photos that accurately represent your artistry. Seek opportunities to face paint at events, even for free initially, to build your portfolio quickly.
Request permission to photograph your clients’ faces and share the images online. A compelling portfolio builds trust and attracts potential clients seeking a skilled face painter;
Troubleshooting Common Face Painting Issues
Paint cracking or flaking? Ensure proper layering and drying times. Skin sensitivity? Always use hypoallergenic, non-toxic paints and perform patch tests beforehand!
Paint Cracking and Flaking
Cracking and flaking are common frustrations for face painters, but easily addressed! Often, this occurs when layers haven’t fully dried before applying the next. Allow each layer to set – a quick blast of cool air from a fan can expedite this process.
Another culprit is applying too much paint at once; thinner, multiple layers are far superior to one thick coat. Ensure your skin is properly prepped with a light moisturizer, as dry skin exacerbates cracking. Finally, consider the paint quality; cheaper paints are more prone to this issue.
Using a setting spray (fixer) can also help to bind the paint and prevent flaking, especially during active events!
Allergic Reactions and Skin Sensitivity
Skin sensitivity and allergic reactions are serious concerns in face painting. Always prioritize safety by using hypoallergenic, non-toxic, and FDA-compliant face paints. Perform a patch test on a small skin area 24 hours before full application, especially for children or individuals with sensitive skin.
Be vigilant for signs of reaction – redness, itching, swelling, or rash. Immediately remove the paint with a gentle cleanser and discontinue use if any irritation occurs. Avoid painting over cuts, eczema, or sunburned skin.
Maintain impeccable hygiene to prevent bacterial infections, which can mimic allergic responses.
Removing Face Paint Safely
Removing face paint gently is crucial to avoid skin irritation. Start with lukewarm water and a soft, clean cloth. Avoid harsh scrubbing, which can cause redness and discomfort. Baby wipes or a mild, fragrance-free cleanser can effectively lift the paint.
For stubborn glitter or heavier designs, consider using a dedicated face paint remover or a small amount of oil (coconut or olive oil) to break down the pigments. Always follow with a gentle moisturizer to replenish skin hydration.
Never use alcohol or acetone, as these can severely dry and damage the skin.

Resources and Further Learning
Online tutorials, communities, and forums offer endless inspiration and support! Explore courses and books to elevate your face painting skills further.
Online Tutorials and Courses
Numerous online platforms provide comprehensive face painting tutorials, catering to all skill levels. From beginner-friendly introductions to advanced techniques, these resources offer step-by-step guidance. Many courses, like those offering 25+ video lessons, provide on-demand access and community support.
Explore video libraries with over 50 extra tutorials, empowering you to master popular designs. Professional courses focus on building a profitable business, covering fast designs, business training, and earning strategies. These resources are invaluable for honing your craft and expanding your repertoire, with over 5000 students already enrolled!
Face Painting Communities and Forums
Engaging with online face painting communities and forums is a fantastic way to learn and grow. These platforms offer a space to share designs, ask questions, and receive constructive feedback from fellow artists. Connect with experienced painters who readily offer tips and tricks, enhancing your step-by-step learning journey.
Discover inspiration, troubleshoot challenges, and stay updated on the latest trends. These communities foster a supportive environment for both beginners and professionals, providing valuable resources and encouragement. Sharing your progress and participating in discussions accelerates skill development and builds confidence.
Recommended Books and Websites
Numerous resources exist to elevate your face painting skills, particularly when following a step-by-step guide. Websites dedicated to face painting often host extensive tutorials, design galleries, and product reviews, offering valuable insights. Books provide structured learning, covering techniques, safety, and design ideas in detail.
Explore platforms offering online courses and video lessons for a more immersive experience. These resources cater to all skill levels, from beginners to professionals, ensuring continuous learning and improvement. Investing in quality materials and knowledge empowers you to create stunning and safe designs.